Skip to content

Category: Microsoft

My home lab setup

My current homelab in ESXi

The last few days I have been busy with creating my new home lab. For years I had the possibility to use my employers or customers test/lab environments, to test new technology and reproduce/troubleshoot issues. I have started working as a freelancer earlier this year and needed my own test environment.

Why a home lab

For me, I use my home lab almost daily. To try and reproduce customer issues and verify their setup or to setup and test new software/settings but most of all to study and gain/improve my knowledge and get my certifications. I will combine my home lab with an Azure environment.

My gear of choice

I want my lab environment to be available 24/7 with low power consumption and I want it to be (very) quiet. I also wanted it to have a dedicated GPU. I did not want to build my own custom computer (takes to much time for me) so I wanted a pre-build computer. Intel offers a large choice of pre-build hardware with good specs!

I have chosen to buy the Intel NUC Hades Canyon. The Hades Canyon offers a good dedicated GPU, fast CPU, M.2 SSD and 32/64GB of memory and a small form factor. The exact specifications of my NUC:

CPU: 3.1GHz Intel Core i7-8705G (quad-core, 8MB Cache, up to 4.1GHz)
Graphics: Radeon RX Vega M GH graphics (4GB HBM2 VRAM), Intel UHD Graphics 630
RAM: 2x Kingston HyperX 16GB DDR4
Storage: Samsung 970 EVO Plus 1TB M.2 SSD

The Intel NUC Hades Canyon

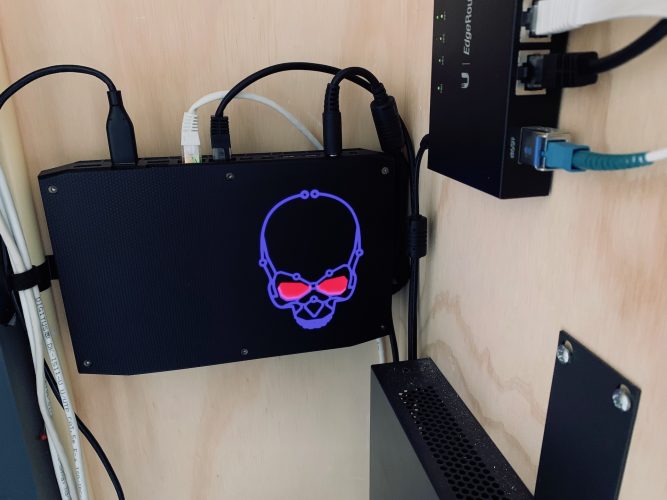
The Hades Canyon is in my opinion currently one of the best pre-build systems to get for a homelab environment. The dedicated GPU allow me (for example) to configure and play with GPU Passthrough in an RDS environment.

My laptop

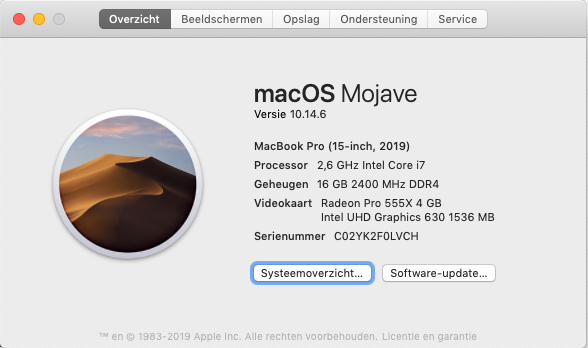
Besides my homelab I have a 2019 Apple Macbook Pro and a Microsoft Surface Pro that I take with me at work. In my homeoffice I have an extra Intel NUC with Windows 10.

  • Apple Macbook Pro 15″ Touchbar (mid 2019)
  • Intel Core i7 (2,6GHz QuadCore)
  • 16 GB RAM 2400Mhz DDR4
  • 265GB SSD
  • Radeon Pro 555x 4GB

This laptop is running a Windows 10 Virtual Machine and applications like Edge Chromium (love it!), Office 365, RoyalTS, 1Password..

My current VM’s

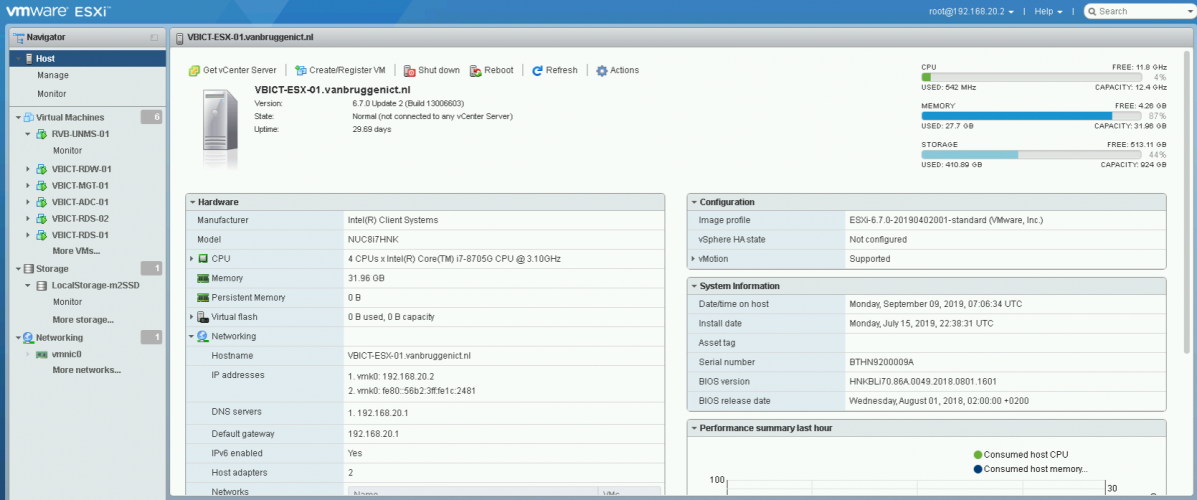
My current homelab is running 6 VM’s with enough space/memory available to run more. This NUC will be able to run roughly +- 8 VM’s easily.
Currently i’m running a full (hybrid) RDSH environment with a few Azure components. All the VM’s are running on Windows Server 2019 except for the Ubiquiti VM, which is a Ubuntu VM.

  • 1x Domain Controller/DNS/Azure AD Connect/SQL Server.
  • 2x RDS Server (RemoteDesktop and RemoteApps).
  • 1x RD Web/RD Gateway.
  • 1x Management/Fileserver/RD Broker.
  • 1x Ubiquiti Unifi and UNMS server (which currently manages 3 different sites with routers/access points).

Besides this I have a Site2Site VPN to from my homelab to Azure, AD Connect and a few virtual machines, like a Windows 10 desktop for Windows Virtual Desktop and Azure storage for FSLogix profile containers.

4 Comments

Make an existing MDT (2012 update 1) enviroment ready for Windows 10

In this post, I will describe the steps needed to update a existing Microsoft Deployment Toolkit (MDT) 2012 environment to MDT 2013 Update 2. This MDT update is needed to prepare for a new automated Windows 10 deployment.

Requirements

MDT 2013 Update 2 has the following requirements

Install Windows ADK for Windows 10

On the existing MDT server, download the Windows ADK for Windows 10 update files. I have placed these files on D:\Downloads\ADK.

  1. Log on to the server with an account that has administrator rights.
  2. Start the ADK Setup (D:\Downloads\ADK\adksetup.exe), and click Continue.
  3. On the Select the features you want to change page, select the features below and complete the wizard using the default settings:
    1. Deployment Tools
    2. Windows Preinstallation Environment (Windows PE)
    3. User State Migration Tool (UMST)

Install MDT 2013 Update 2

Download the MDT 2013 Update 2 files to D:\Downloads\MDT

  1. Install MDT (D:\Downloads\MDT 2013\MicrosoftDeploymentToolkit2013_x64.msi) with the default settings
  2. Start the Deployment Workbench
  3. Right click on your Deployment Share and click ‘Upgrade Deployment Share’. This update can take a while, depending on the size of your MDT environment.
Leave a Comment

Allow change password via RDP

I’ve experienced a few times that i’m not allowed to login using RDP because my password is expired or that ‘use must change password at next login’ is enabled in the Active Directory.

Today was one of those moments. I could not login to an customer environment i havent logged in to for a while, because my password was expired. So ehm.. I had to login to change my password, but I could not login to change my password because my password was expired.. right..
Now what? The customer wasn’t available at that time and I had to get to work.

I have found the following work around for that.

Lokaal

  1. Start mstsc.exe
  2. enter the remote desktop connection
  3. Click ‘Save as..’
  4. Save the RDP file as something like: ChangePassword.RDP
  5. Open notepad.exe and open the RDP file you just created.
  6.  add enablecredsspsupport:i:0 at the bottom of the file.clip_image003_thumb

Save the file, start the RDP connection using this file. Now you will have the possibility to change your password!

What if CredSSP is required?

If CredSSP (Credential Security Support Provider is required to login to the remote desktop, you will get the following error message:
Try to make an RDP connection using the full FQDN (servername.domain.local) in stead of just the servername. Otherwise, the above solution is not possible. Except when you disable CredSSP.

CredSSP can be disabled to change de RDP settings on the remote desktop to disable ‘Allow connections only from computers running Remote Desktop with Network Level Authentication (recommended).’

Leave a Comment