Skip to content

Tag: network

T-Mobile Thuis fiber with EdgeRouter X SFP (updated)

Update 10-2021: I have updated this post at the end since it is for (some) new customers possible to configure only VLAN300 for both internet and television. So a router with built-in switch is not required.

In my previous post I have shown you my configuration with T-Mobile Thuis fiber with the EdgeRouter Lite. I’ve told you there that I still had a few configuration issues with IPTV. I wasn’t able to create a working scenario without a few (annoying) workarounds.
So to create a better working setup I have chosen to replace the EdgeRoute Lite with the EdgeRouter X SFP. As the name already tells you, this router has an built-in SFP (fiber) port. This router is alo has switching capabilities and PoE (Power over Ethernet) to directly power my Ubiquiti Access Points.
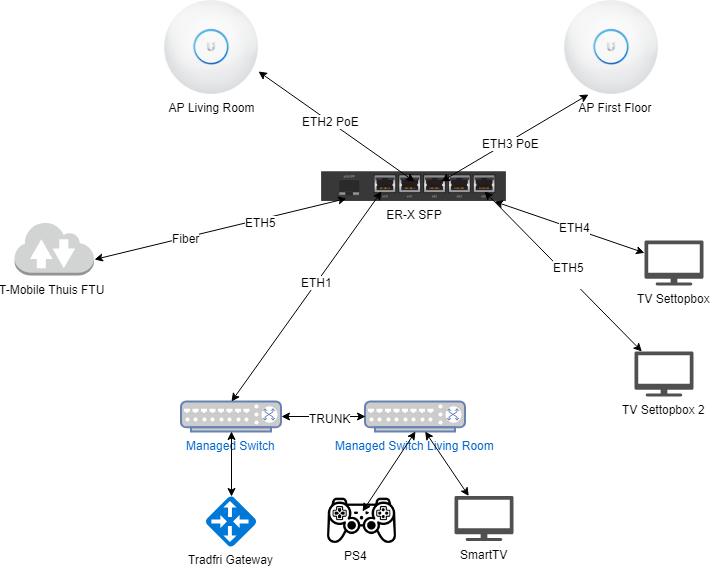
My set-up

I have updated my set-up a bit since my last post. I have added the (two) Ubiquiti AP’s to the PoE ports on the EdgeRouter instead of the managed switch, so I can get rid of the PoE converters. The T-Mobile settopbox is directly attached to the EdgeRouter. I can also chose to attach these to the managed switch, so I can add more settopboxes than two. All my other ethernet devices are attached to the managed switches (like my Tradfri gateway, PS4, SmartTV, HTPC, etc.)
Both switches are configured to deliver VLAN300 (internet) and VLAN640 (IPTV). Between both switches is a trunk configured to transfer both VLAN’s.

The configuration of the EdgeRouter X SFP

Below here is a copy of my configuration with a few details like port mappings, IP assignments and passwords cleared.
In short, i have the following configuration:

  1. Configure ETH5/SFP as the WAN port;
  2. Create an internal switch for seperating traffic to VLAN300 (internet) and VLAN640 (IPTV) and VLAN1 for the internal network;
  3. Configure the PoE ports for the Access Points;
  4. Configure the internal switch and assign the ports on the router for internet, internal network or iptv;
  5. Configure default firewall rules, allow NAT, configure offloading, etc.

Click ‘read more’ to view the configuration details.

44 Comments

Install OpenWRT on the TP-Link TL-WR1043ND and Ziggo in Bridge Mode

I use the internet signal of the (dutch) internet provider Ziggo. Ziggo delivers a standard router, they gave me the Cisco EPC 3925. They also deliver a few other brands like Ubee and other Cisco devices. Ziggo delivers these routers with their own custom firmware and in my opinion, they are not that good. I have experienced a lot of instability issues with wired signal and (very) bad wireless signal.
Because of these issues, and hearing others complain about it too, i started looking in to placing my own router.

I have chosen to use the TP-Link TL-WR1043ND v2, because of the good reviews on Tweakers.net. The default firmware if fairly good, but I wanted some extra features.. So i’ve started to look at custom firmware.

Why OpenWRT?

I have compared a few different types of custom firmware, OpenWRT, DD-WRT and Gargoyle. All three are good, but I have chonen OpenWRT because of the following reasons:

  • Small, clean, configurable. The power of OpenWRT is in their ‘package manager’. In comparing to DD-WRT, OpenWRT gives you only a minimal installation. Other features like VPN needs to be installed using the package manager. This gives you a fast and minimal default installation. Installing new features using the package manager is done by a few simple clicks.
  • Simplicity In my opinion, the default LuCi webinterface looks good and everything is easy to find and configure. With just basic knowledge and common sense, you will be able to configure the standard configuration of your router. Without needing to know how to type in difficult commands in to the command line. The LuCI webinterface is installed by default, and you have the option to install another webinterface if you like.
    openwrtconsole

Requirements

You will (temporarily) have no internet connection during the installation of OpenWRT. Make sure you have a pc of laptop directly connected with a network cable to your router.

  • (optional) set the Ziggo router to ‘bridge mode. You will have to call the Ziggo support to do that.
  • PuTTY if you are using Windows
  • the right OpenWRT firmware (factory image). Check your TP-Link router if you have the v1 or v2 version. I have the v2.

Installation

The installation of the OpenWRT firmware on the TP-Link WR1043ND is fairly easy. Make sure you have downloaded the right factory image. Log in to the webinterface of the TP-Link. In case of the default settings this will probably be https://192.168.1.1. Go to System Tools -> Firmware Upgrade. Chose the factory image firmware you have downloaded and start the upgrade. After a few minutes, your router will reboot and OpenWRT will boot up.

That’s it. The basic installation is done. Take your time to go through the webinterface (https://192.168.1.1), configure a good and secure password for the root account, configure the wireless connection to your preferences and have fun!

Extra: Networking statistics

OpenWRT gives you real-time statistics about your network (usage) bij default. But it does not save historical data. I have installed ‘collectd’ to let the router do that. This option saves information about your network usage and uses a really small amount of storage. I have used the following manual: https://advanxer.com/blog/2013/02/openwrt-monitoring-using-collectd/.

1. Update package
opkg update
2. Install luci-app-statistics
opkg install luci-app-statistics
3. List out supported plugins for collectd
opkg list | grep collectd-mod
4. Install desired plugins
opkg install collectd-mod-cpu collectd-mod-interface collectd-mod-memory collectd-mod-ping collectd-mod-rrdtool collectd-mod-wireless
5. Enable init script
/etc/init.d/luci_statistics enable
/etc/init.d/collectd enable

openwrtstats

Comments closed