Azure Bastion is a new Azure service that enables you to create private RDP and SSH to Azure machines. Before Azure Bastion, you would have to create VPN access to Azure or assign a public IP address to the virtual machine(s) and allow RDP/SSH access from the internet. Before Azure Bastion you could secure the access to the virtual machine using Just In Time VM Access or a VPN. Bastion gives you a full private service in your Azure virtual network so you can access your machines using SSL in the browser without the need to expose your machines.
Azure Bastion is currently in preview. You can access the preview using this URL : https://aka.ms/BastionHost.
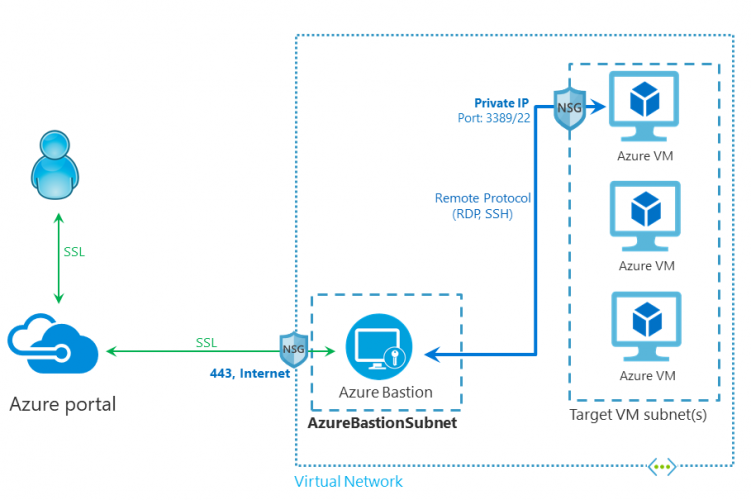
Azure Bastion architecture
How Azure Bastion Works
The Azure Bastion service works over port 443 (SSL) and this is the only port and connection Bastion uses. So port 443 will be the only port that you will have to enable in your virtual network (NSG). Behind Bastion it will connect to your devices over port 3389 (RDP) or 22 (SSH) to the virtual machines.
Alternative to Azure Bastion, you could work with a VPN service to Azure, IP access (with whitelisting) or Just In Time VM Access.
Click the READ MORE button to start going though the actual configuration
The last few days I have been busy with creating my new home lab. For years I had the possibility to use my employers or customers test/lab environments, to test new technology and reproduce/troubleshoot issues. I have started working as a freelancer earlier this year and needed my own test environment.
Why a home lab
For me, I use my home lab almost daily. To try and reproduce customer issues and verify their setup or to setup and test new software/settings but most of all to study and gain/improve my knowledge and get my certifications. I will combine my home lab with an Azure environment.
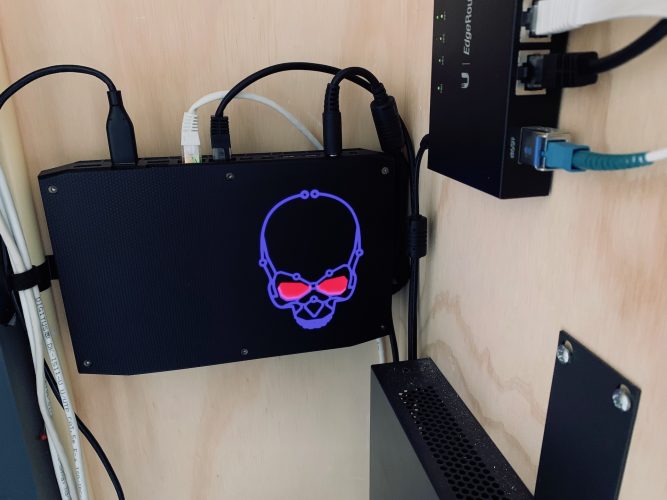
My gear of choice
I want my lab environment to be available 24/7 with low power consumption and I want it to be (very) quiet. I also wanted it to have a dedicated GPU. I did not want to build my own custom computer (takes to much time for me) so I wanted a pre-build computer. Intel offers a large choice of pre-build hardware with good specs!
I have chosen to buy the Intel NUC Hades Canyon. The Hades Canyon offers a good dedicated GPU, fast CPU, M.2 SSD and 32/64GB of memory and a small form factor. The exact specifications of my NUC:
CPU: 3.1GHz Intel Core i7-8705G (quad-core, 8MB Cache, up to 4.1GHz) Graphics: Radeon RX Vega M GH graphics (4GB HBM2 VRAM), Intel UHD Graphics 630 RAM: 2x Kingston HyperX 16GB DDR4 Storage: Samsung 970 EVO Plus 1TB M.2 SSD
The Intel NUC Hades Canyon
The Hades Canyon is in my opinion currently one of the best pre-build systems to get for a homelab environment. The dedicated GPU allow me (for example) to configure and play with GPU Passthrough in an RDS environment.
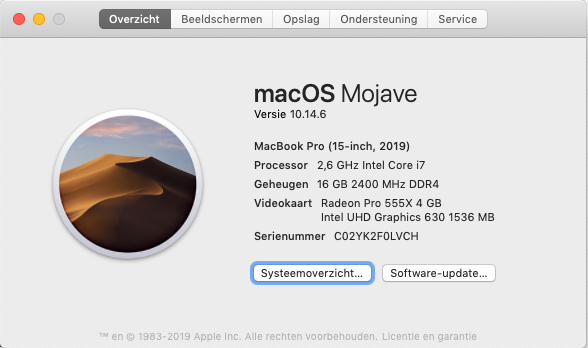
My laptop
Besides my homelab I have a 2019 Apple Macbook Pro and a Microsoft Surface Pro that I take with me at work. In my homeoffice I have an extra Intel NUC with Windows 10.
Apple Macbook Pro 15″ Touchbar (mid 2019)
Intel Core i7 (2,6GHz QuadCore)
16 GB RAM 2400Mhz DDR4
265GB SSD
Radeon Pro 555x 4GB
This laptop is running a Windows 10 Virtual Machine and applications like Edge Chromium (love it!), Office 365, RoyalTS, 1Password..
My current VM’s
My current homelab is running 6 VM’s with enough space/memory available to run more. This NUC will be able to run roughly +- 8 VM’s easily. Currently i’m running a full (hybrid) RDSH environment with a few Azure components. All the VM’s are running on Windows Server 2019 except for the Ubiquiti VM, which is a Ubuntu VM.
1x Domain Controller/DNS/Azure AD Connect/SQL Server.
2x RDS Server (RemoteDesktop and RemoteApps).
1x RD Web/RD Gateway.
1x Management/Fileserver/RD Broker.
1x Ubiquiti Unifi and UNMS server (which currently manages 3 different sites with routers/access points).
Besides this I have a Site2Site VPN to from my homelab to Azure, AD Connect and a few virtual machines, like a Windows 10 desktop for Windows Virtual Desktop and Azure storage for FSLogix profile containers.
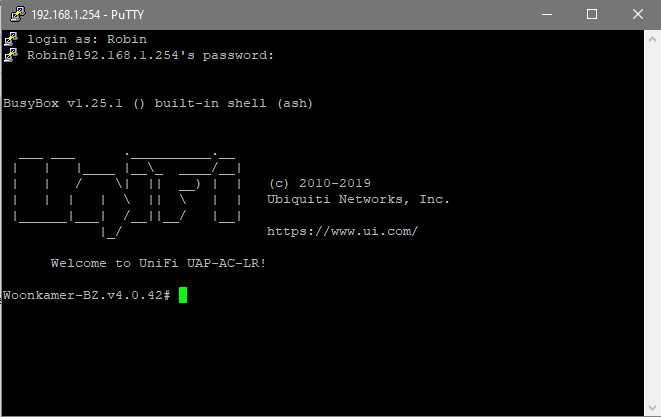
I was in the process of upgrading a few Unifi Access Point firmware’s and ran in to a problem where the AP’s would not (re)connect to the Unifi Controller when I initiated the firmware update. It was stuck in the update state without actually updating the firmware. The controller showed them as offline/updating. It was still able to ping it and it was reachable over SSH.
I needed a way to update the firmware using SSH. I looked up the exact firmware download URL on https://www.ui.com/download/. I connected to the specific AP using SSH (Putty) and was able to perform the update manually by running the following command:
This command took a few minutes to start running and successfully completed the firmware update. I was able to manage them again in the controller with it’s new firmware.
If the AP is on a low firmware level, it may come back with a error that it could not download the firmware because of a certificate error. In that case you can simply change https:// to http://.
This website uses cookies to track the amount of visitors. This website does not store any personal details, I just want to know which posts are the most popular :) If you continue to use this site I will assume that you accept these cookies (or use a browser plugin like Privacy Badger).AcceptDecline