Update 10-2021: I have updated this post at the end since it is for (some) new customers possible to configure only VLAN300 for both internet and television. So a router with built-in switch is not required.
The amount of configuration information on T-Mobile Thuis fiber connections with EdgeRouter equiptment is a bit scarce. The configuration looks a lot like the KPN Fiber and Vodafone configuration, but is slightly different.
I have chosen to use a fiber to ethernet converter, the TP-Link MC220L. But I think that I will buy the new EdgeRouter 4 when it comes to the Netherlands. Which is roughly the EdgeRouter X with fiber port and the EdgeRouter Lite combined. But for now, this configuration is based on the EdgeRouter Lite 3.
T-Mobile and their VLAN’s
At first, we need to know that T-Mobile seperates the internet and IPTV connection using VLAN’s. VLAN300 is used for the internet traffic and VLAN640 is used for the IPTV traffic. T-Mobile seperates this traffic in their own router. We will have to do the same in our configuration. Later on, we will devide our connection using a bridge in to two seperate VLAN’s. These VLAN’s will be made available in the switches.
My set-up
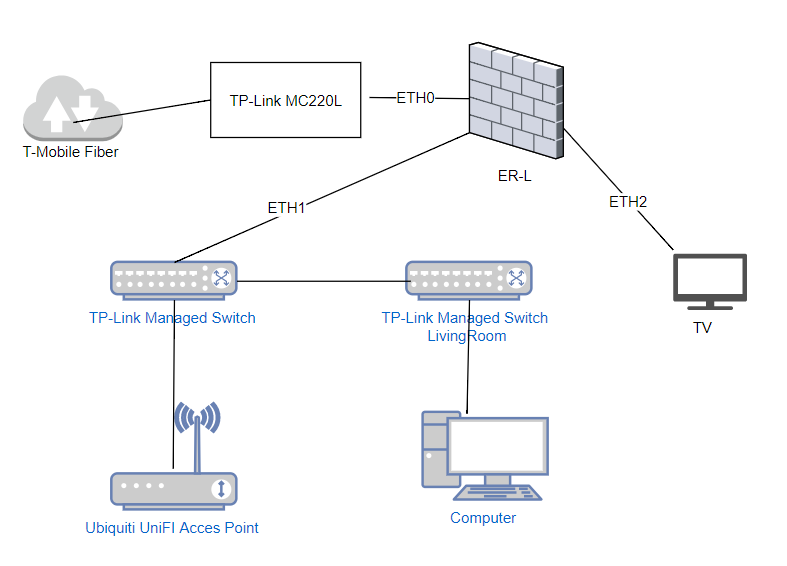
My set-up is fairly basic. In the diagram below, I have drawn out my setup. Let me talk you through it; The fiber connection comes in at the fiber converter and is attached to the ETH0 interface of the EdgeRouter-Lite (ER-L). The LAN connection is on ETH1 and is connected to an managed ethernet switch. The ETH2 is (in my case) directly attached to the IPTV box.
The switch has (multiple) Ubiquiti UniFi access points attached, a few wired devices (laptop, Ikea Tradfri gateway, a computer) and a (trunk) connection to another managed switch in the living room for my Playstation, TV and HTPC.
The configuration of the EdgeRouter Lite
Below here is a copy of my configuration, with a few details cleared. These are port mappings, static IP assignments and passwords. What this configuration does is the following:
- Create ETH0 for the WAN connection, with DHCP enabled so it receives it’s (external) IP from T-Mobile
- Split ETH0 in to ETH0.300 for the VLAN300 and ETH0.640 for the VLAN640 traffic (internet and iptv)
- Creathe ETH1 with local IP adresses in the 192.168.0.0/24 range. ETH1 has VLAN300 attached for the internet traffic.
- Creathe ETH2 without an IP adres (T-Mobile will handle that itself) with VLAN640 attached for IPTV.
- Create a few default firewall rules to block harmful traffic.
- Allow NAT for VLAN300 for the internet traffic
- Enable an IGMP proxy for IPTV